The “Candy Bar” Coffee: How to Bridge Your Fast Without the Bitter Aftertaste

Candy Bar Coffee

Black coffee is gross… I said it…

I absolutely cannot stand black coffee. If “brown bitter water” is your jam, then read no further… but to all my kindred spirits who think a creamy, decadent cup of joe is the only way to kick off a 10k-step day, I have something special for you.

This recipe is the ultimate “metabolic bridge.” It is low enough in net carbs to keep your insulin levels stable and keep you in ketosis, unless you follow the strictest “water-only” fasting rules. It also provides the healthy fats needed for brain fuel and thermogenesis.

It’s not just coffee; it’s a metabolic tool and a strategic deposit into your nutritional bank account.
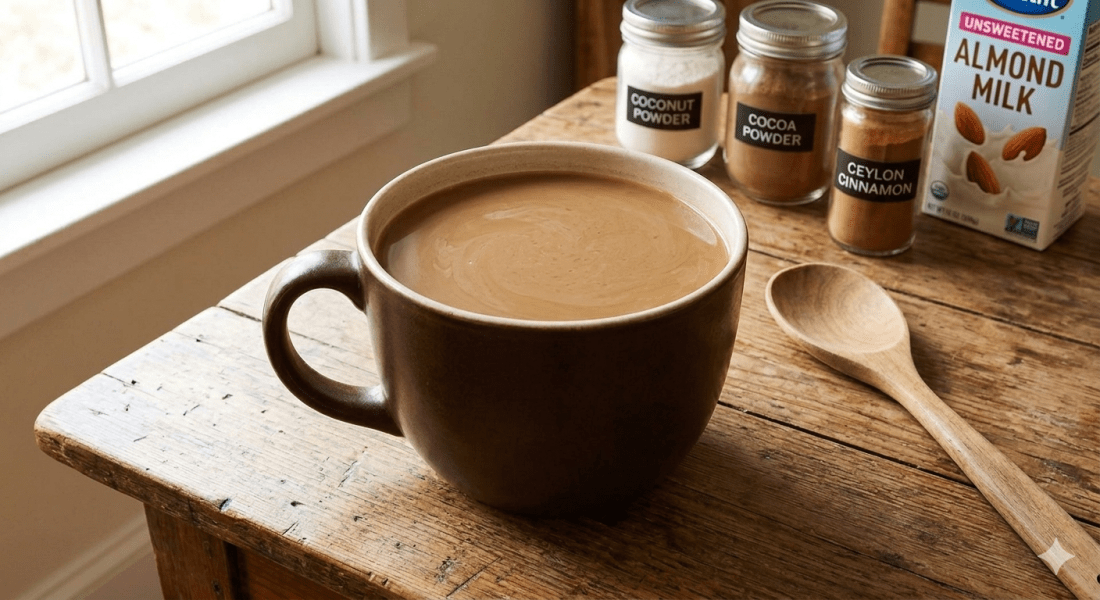
The Candy Bar

  • 3 cups of high-quality Coffee
  • 35 ml Unsweetened Almond Milk (High-Calcium)
  • 1/2 TBS Stevia (or to taste)
  • 1 TBS Coconut Powder
  • 1.5 tsp Cocoa Powder
  • 1/2 tsp Ceylon Cinnamon

IngredientThe “Super You” Benefit
Coconut PowderHigh in MCTs for immediate energy and thermogenesis.
Cocoa PowderPacked with Polyphenols for heart health and mood.
Ceylon CinnamonHelps regulate Blood Sugar and insulin sensitivity.
Almond MilkProvides a Calcium Deposit for bone density.

Why These Ingredients Matter

1. Coconut Powder (The Metabolic Engine)

Coconut is rich in Medium-Chain Triglycerides (MCTs). Unlike long-chain fats, MCTs are sent directly to your liver to be used for immediate energy. This promotes thermogenesis—essentially turning up your body’s internal furnace to burn fat while you’re still in your fasting window, and providing immediate brain fuel [1].

2. Cocoa Powder (The Vascular Flush)

Beyond the rich flavor, cocoa is packed with flavanols that improve Flow-Mediated Dilation (FMD). This helps relax your blood vessels and improves circulation, which is critical for heart health and muscle recovery. It’s a a great pre-workout “deposit” if you’re headed to the gym [2].

3. Ceylon Cinnamon (The Blood Sugar Guard)

Not all cinnamon is created equal. I use Ceylon (the “true” cinnamon) because it is a powerhouse for insulin sensitivity. It keeps your blood sugar from spiking by helping your body process glucose more efficiently. This ensures your morning cup supports stable blood sugar levels throughout the day and doesn’t kick you out of your fat-burning state. [3].

4. High-Calcium Almond Milk (The Bone Deposit)

By choosing an unsweetened almond milk fortified with calcium (look for ~450mg per cup), you are making a literal “Bone Deposit.” High-intensity training can cause the body to “rob” calcium from your bones if blood levels drop; this pre-exercise calcium feeding protects your skeletal density for the long haul [4].

The “Super You” Final Proof

By the time I finish this cup, I’ve fueled my brain, protected my bones, and primed my metabolism—all before my first solid meal. It’s about re-engineering the frame from the inside out.


Sources

[1] Weight-loss diet with MCTs leads to greater energy expenditure – PubMed

[2] Cocoa Flavanol Cardiovascular Effects Beyond Blood Pressure Reduction – PMC

[3] Cinnamon: Potential Role in the Management of Insulin Resistance – PMC

[4] Nutrition and Athlete Bone Health – PMC

The Root of Resilience: Why Ginger is a High-Performance Staple

The Science of Ginger: A Natural Powerhouse for Modern Wellness

Ginger has been a cornerstone of traditional medicine for centuries, but modern science is finally catching up to why this root is so effective. It isn’t just a flavor enhancer; it is a bioactive tool that addresses several of the most common health challenges we face today—from chronic inflammation to digestive distress.

1. Cooling Chronic Inflammation

Inflammation is the body’s natural defense against injury or infection. However, when it becomes chronic, it acts as a silent driver for serious conditions like arthritis and heart disease. Ginger contains potent compounds called gingerols and shogaols. These act as internal “coolants” by inhibiting the production of pro-inflammatory cytokines, helping to keep the body’s immune response in a healthy balance [1].

2. Natural Relief for Nausea and Pain

One of ginger’s most celebrated benefits is its ability to soothe the digestive system. It effectively blocks the chemical signals in the brain that trigger nausea, making it a reliable remedy for motion sickness and post-treatment recovery [2].

Beyond digestion, those same gingerols offer analgesic (pain-relieving) effects. Studies show that regular ginger consumption can be effective for managing exercise-induced muscle soreness and joint pain [3].

3. Strengthening the Foundations: Immunity and Brain Health

Ginger supports the body’s long-term resilience through:

  • Immune Support: Rich in sesquiterpenes, ginger provides antimicrobial properties that help the body fend off common viruses [4].
  • Cardiovascular Care: By assisting the liver in regulating cholesterol production, ginger helps maintain clearer pathways for heart health [5].
  • Cognitive Protection: Its neuroprotective properties help shield brain cells from oxidative stress, a key factor in maintaining memory and focus as we age [6].

4. Maximizing Your Digestion

Effective digestion is the bedrock of energy. Ginger stimulates the production of vital digestive enzymes, which ensures that the food you eat is broken down and absorbed efficiently. This reduces the likelihood of uncomfortable bloating, gas, and sluggishness after meals [2].


Integration and Safety

Whether used fresh in a smoothie, steeped as a potent tea, or taken in a concentrated supplement, ginger is highly adaptable.

A note of caution: because ginger can have natural blood-thinning properties, it is important to consult with a healthcare professional if you are currently taking anticoagulants or other specific medications.


References

[1] Anti-Inflammatory and Antioxidant Activities of Ginger – IntechOpen

[2] The Effectiveness of Ginger in the Prevention of Nausea and Vomiting – PMC

[3] Clinical Trials on Pain Lowering Effect of Ginger: A Narrative Review – PMC

[4] Ginger for Colds: How to Use Ginger for a Sore Throat – Medical News Today

[5] Plasma Cholesterol-Lowering Activity of Gingerol- and Shogaol-Enriched Extract – ACS Publications

[6] Zingiber officinale Improves Cognitive Function of Healthy Women – PMC

The Myth of “Like Cures Like”: Why Cottage Cheese Actually Fights Cottage Cheese Thighs

We’ve all heard the health “wisdom” that sounds catchy but makes zero sense. “Drink more water to lose water weight!” (True). “Eat fat to burn fat!” (Also true, within reason).

But then, a question popped up in my feed: “If water helps flush out water, and fat helps flush out fat, does cottage cheese help get rid of cottage cheese thighs?”

It sounds like a joke. But biologically speaking, the answer is a resounding YES. Just not because of the name. Let’s look at the “Master Ledger” of why these strategies actually work.

1. Water to Water: The “Flush” is Real

When you’re dehydrated, your body enters “famine mode,” secreting Vasopressin (Antidiuretic Hormone) to cling to every ounce of fluid [1]. This causes the scale to spike and your joints to feel stiff.

  • The Science: Drinking water suppresses Vasopressin and signals the kidneys to excrete excess sodium. Since sodium “pulls” water into the extracellular space, flushing the salt flushes the bloat [2].
  • The Case Study: After a high-sodium Saturday, my scale hit 158.4 lbs. I didn’t gain 2 lbs of fat overnight; I gained a “Sodium Debt.” Sunday is for 100oz of water to “dilute the vault.”

2. Fat to Fat: The Metabolic Key

We were told for decades that fat makes you fat. The data says otherwise.

  • The Science: Healthy fats—like the MCTs in my “Candy Bar” coffee—promote satiety and thermogenesis. Specifically, Medium-Chain Triglycerides are sent straight to the liver for energy rather than being stored as adipose tissue [3].
  • The “Super You” Move: I use coconut powder to bridge my morning fast. It keeps my insulin low and my brain fueled, allowing my body to continue burning its own stored fat for energy.

3. Cottage Cheese to “Cottage Cheese” Thighs: The Recomposition Revelation

Cellulite (the “cottage cheese” look) isn’t just fat; it’s a structural failure. It happens when fat cells push through a weakened dermal matrix—the “netting” of your skin.

  • Casein Protein: Cottage cheese is 80% Casein, a slow-digesting protein that provides a 6–8 hour “drip” of amino acids to repair muscle and skin [4].
  • The Leucine Trigger: It’s loaded with Leucine, the specific amino acid that triggers Muscle Protein Synthesis (MPS). Clinical trials show that Leucine-rich diets help maintain lean mass while targeting fat loss [5].
  • The Result: Today, my thighs are symmetrical at 24.5″. By building the muscle density underneath and using the amino acids to strengthen the skin “netting,” the surface naturally smooths out.

🛡️ Science vs. Superstition: The “Super You” Sidebar

On social media, people often fall for the Doctrine of Signatures—the ancient belief that foods that look like body parts are meant to heal them (e.g., “Walnuts look like brains”).

The Distinction:

  • The Superstition: Eating cottage cheese because it “looks like” the problem.
  • The Science: Eating it because its Casein and Leucine content are the exact raw materials required to rebuild the dermal matrix and muscle density.

The Final Proof: The Belt Doesn’t Lie

While the scale was “heavy” today at 158.4, I officially hit the 3rd hole on my favorite belt. On January 1st, I could barely fasten the 1st hole. That is 2 inches of real estate gone from my waist while my legs got stronger. That’s not a “diet”—that’s re-engineering the frame.

Stop chasing the number. Start feeding the density.


Sources

[1] Physiology, Vasopressin – StatPearls – NCBI Bookshelf

[2] Vasopressin regulation of renal sodium excretion – James D. Stockand

[3] Weight-loss diet with MCTs leads to greater energy expenditure – PubMed

[4] The Role of Casein Protein in Muscle Protein Synthesis – PMC

[5] Leucine may help to burn fat but spare muscle wastage: Pilot study – Nathan Gray

10 Tips to Minimize Food Waste and Save Moolah

I’ve been working in professional kitchens for 25+ years

In that time, I’ve learned a lot about food waste and how to avoid it. The restaurant industry is a nickel and dime business. The cost of waste adds up quickly. We try to do whatever we can to save costs, but not only that, to save food. There are millions, if not billions of people in the world who don’t have enough to eat and it’s reckless, irresponsible, and just downright mean, to throw away food.

I’ve put together a quick post here on some simple ways to re-purpose scraps and food that might not be super fresh, but still good. Also some items you might not have thought were usable at all!

1. Save bones for chicken, beef, or fish stock

2. Bake carrot peels into chips, or make carrot pesto

3. Freeze veg scraps for veggie broth or stock

4. Cook spinach (link to spinach w/ lemon and garlic recipe, posts on 11/30)

5. Composting/Fertilizer

6. Natural Dyes for Easter eggs

7. Turn leftovers into a new meal (tacos, stir fry, casseroles, chicken salad, soup)

8. Save old bread for croutons or breadcrumbs – old flat breads such as pita or tortillas can be baked, fried, or air fried, into chips

9. Turn leftover rice into fried rice

10. Turn overripe brown avocado into flourless and fudgy avocado brownies

Remember, when you cook from scratch you know exactly what is going into your body. Have a happy and healthful life!


~Thanks for reading
LC

Lemon and Garlic Sauteed Spinach

Light, delicate, and healthy, this simple spinach dish can accompany so many things. It goes especially well with fish. It can also be tossed in with pasta.

Yields ~ 1 serving, or 2 small servings

Ingredients:

  • 1 medium-large handful of baby spinach
  • 1-2 cloves garlic, shaved on a mandolin or sliced thin by hand
  • 1 lemon, juice and zest
  • 2-3 TBS canola oil
  • Salt to taste
  • 1 TBS EVOO for drizzle (optional)

Method:

  • Heat the canola oil in a saute pan
  • Add the garlic chips to the pan and simmer until golden
  • Remove the garlic and reserve for later
  • Pour out almost all of the canola oil
  • Add in the spinach and juice half the lemon while it’s in the pan. Sprinkle with salt. Flip the pan a few times. You just want to wilt the spinach, not cook it all the way. it only takes a few seconds.
  • Remove from the heat, toss the garlic back in, and flip it around again.
  • Top with lemon zest, squeeze more lemon juice on top if needed.
  • Drizzle with EVOO if desired
  • Enjoy!

Homemade Chicken Stock or Broth

Making your own chicken stock or broth at home is easy and is a great way to use the bones instead of throwing them away.

When I buy chicken I usually get the dark meat quarters which is the leg and thigh still attached. Dark meat is cheaper than breasts, and more flavorful.

Then I cut the bone off of the end of the thigh opposite the leg, then separate the leg and thigh. I also take off any extra skin hanging off the side.

I take a few of the thighs and remove the skin completely and take out the bone. Then I freeze all the chicken in meal sized portions to pull out as needed.

After that, I put all the bones and leftover skin into a stock pot. I put the skin in with it because later when it cools, it’s easier to peel it off the top.

Next, I add some aromatic veggies like celery, onions, and smashed garlic cloves. For a darker, richer stock roast the bones first and also add carrots. It’s not necessary to peel the onions or garlic. They will be strained out, and the nutrients from the skins will be in the stock. If you wash your carrots well you don’t need to peel them either.

Also throw in some black peppercorns, bay leaves, and whole sprigs of thyme.

Then, fill the pot with cold water. You want to start with cold water because sstarting with hot water draws out more impurities and clouds the stock. I know some chefs that even start their stocks with straight ice.

Turn on the heat and let it ride for an hour or two. I like to get it almost to a boil then cut back the heat and let it simmer, never letting it come to a full boil.

Next, strain it into another pot.

From here you have a couple of options..

You can cool it now and then skim the fat off the top, and use it, or you can reduce it even more for a thicker, more gelatinous stock. Either option is good, it just depends on how thick you want it to be. Since I’m going to be using it for stew, I’m going to reduce it some more.

After it cools, the fat comes right off!

What your left with is a luxurious flavorful liquid that can be used as a soup base, in velouté, substituted for water when making rice, and much more!

I don’t add salt to my stocks. I save that for when I make the actual dish. Many of the store bought broths and stocks have salt in them. I prefer to make my own so I have complete control over what goes in.

With store bought stocks you also never know for sure the quality of the ingredients. The best stocks use high quality items and the only way to know for sure is to make it yourself!

It is time consuming, but luckily it freezes well so you can make a big batch and freeze it in smaller portions. This way you can just pull out a little at a time as needed.

Next time you feel like homemade chicken noodle soup, you’re ready to go!

Broth is even easier because you don’t use bones, just the meat and veggies. This is an even quicker and simpler way to make your soup base, although it won’t be as thick and full bodied. It will still be delicious!

For chicken broth, just throw some skinless boneless chicken, onions, celery, smashed garlic cloves, bay leaves, and a sprig of thyme into a pot, cover with cold water, and bring to a simmer. Simmer about an hour or so. Strain out the broth, and use the chicken for chicken salad, or whatever you’d like!

Enjoy!

~Thanks for reading
LC

Apples

Apples are one of the top five fruits produced in the world and are readily available year round. They’re also delicious! And the magnitude of health benefits they hold makes it seemingly impossible to not eat one every day!

Apples are an abundant source of:

To get the full benefits, wash them well and leave the skin on. That’s where most of the nutrients are. Unpeeled apples have 2-6 times the antioxidant activity as peeled ones.

Apples are extremely versatile in the kitchen! You can eat them raw or cooked, hot or cold, for breakfast, lunch, or dinner… They’re amazing!

Try pairing them with dark chocolate, cheese, or pork. They’re awesome baked with honey, cinnamon, and walnuts!

The fiber in apples can help promote circulatory and heart health, while helping you lose weight by helping you feel fuller, longer.

Vitamin C is a powerful antioxidant and is essential for the development, growth, and repair of your body’s tissues. Antioxidants boost the immune system and protect against free radicals, which are molecules harmful to the body. Vitamin C can’t be produced by the body so it’s important to consume it through fresh fruits and vegetables.

A diet rich in potassium can help prevent osteoporosis, reduce the risk of a stroke, and regulate fluids.

Phytochemicals play a prominent role in the prevention of cancer, cardiovascular disease, strokes, and cognitive decline due to aging.


Try to make apples a daily part of your healthy eating routine!

Thanks for reading ~ LC


Baked Apples w/ Cinnamon and Walnuts

Here’s an easy, healthy, and delicious way to enjoy apples! (As if they weren’t delicious and enjoyable on their own..)


Ingredients:

  • Apples
  • Cinnamon
  • Walnuts


Method:

  • Preheat oven to 350 degrees
  • Core and slice an apple (or several apples)
  • Sprinkle with cinnamon
  • Toss in some walnuts
  • Mix all together in a bowl
  • Transfer to a baking sheet
  • Bake for 35 min, turn oven off and let sit for awhile
  • Enjoy!

*Chef’s note: If you’re not having to watch your sugar too closely then honey is a wonderful addition to this dish


Tuna and Lentil Bowl

This bowl of goodness is packed with Omega 3’s, low fat protein, fiber, B vitamins, Iron, Folate, Potassium, Magnesium, Phytonutrients, Vitamin E, Selenium, Calcium, CoQ 10, Lutein, Zeaxanthan, Beta-corotene, Vitamin C, and much more!


Ingredients:

  • 3oz Seared Tuna, rare, sliced
  • 1/4 cup lentils, cooked in veggie broth
  • 1 tsp garlic, minced
  • 1 1/2 tsp shallots, minced
  • pinch of aleppo pepper (or chili flakes)
  • 1/4 cup tomatoes, seeded and chopped
  • 1/4 cup asparagus, blanched or grilled, cut on a bias in 1/4″ pieces
  • 1/2 tsp each: rosemary, thyme, parsley
  • 1 small handful spinach
  • Sliced scallion for garnish, squeeze of lemon, lemon zest

Method:

  • Cook the lentils, (preferably in homemade veggie broth!)
  • Save some of the broth and set aside
  • Get a saute pan hot with your favorite (healthy) cooking oil
  • Throw in the garlic, shallots, and aleppo, saute about 30 seconds
  • Add the tomatoes and asparagus
  • Saute a minute or 2, then
  • Add about 1/2 cup veggie broth and the miso
  • Fully incorporate the miso while bringing it to a boil
  • Add the lentils
  • Check the seasoning for salt and pepper, if needed
  • Add the herbs, toss it around
  • Throw in the spinach. As soon as it starts to wilt, pull it off the heat
  • Put it all in a bowl and top it with the seared sliced tuna
  • Garnish with scallions and lemon zest, and squeeze some lemon juice on it
  • Enjoy!

**This can be a soup too, just add more veggie broth, and maybe substitute scallops for the tuna! You could even whisk up an egg and drizzle it in while the soup is simmering.


Homemade Veggie Broth

There’s no real set recipe here as far as quantities go, or ingredients, but making your own veggie broth at home is easy and it lets you control the quality of ingredients as well as salt content.

Why buy it, when you can make it?

Use your veggie broth in homemade soups and sauces. I even use it instead of water to cook beans, rice, and quinoa for another layer of flavor!

Usual Ingredients:

  • Carrots
  • Celery
  • Yellow onions
  • Garlic
  • Bay leaves
  • Whole black peppercorns
  • Fresh thyme

Method:

  • Rough chop all the veggies and throw them in a pot
  • Add all other ingredients
  • Cover with plenty of cold water
  • Bring to a boil, then simmer for awhile
  • Strain liquid
  • Enjoy!

**Tip: Don’t include salt. You will more than likely be adding to salt to whatever dish you are using your homemade veggie broth in. No need to add it twice!

**Side note: There are many opinions on making stocks and broths. Some people peel the carrots and onions, and trim the leaves off the celery because they think it turns it bitter. Some people don’t. It is entirely up to you. There are no rules!

**I save my veggie scraps in a bag in the freezer when I cook and throw them in as well when I make broth. Also, you are not limited to the ingredients listed above. Try adding mushrooms, peppers, etc. into your broth. If you’re going for a particular color though, keep than in mind when adding your ingredients.

**This recipe freezes well. Make a big batch and portion in in smaller amounts to freeze. Then just pull some out as you need it.